我發現大部分使用 Octopress 的 Blogger,通常 octopress 的第一篇文章就是 How to install octopress, 大概是安裝完之後,就順手試看看這個專門為 geek 打造的 blog 吧 :D
Why Octopree
如果你跟我一樣想找個可以貼 code 的 blog service 又不想花錢,octopress 是不錯的選擇, btw,xdite 大有一篇很詳細的說明了 Why Octopress
PS: 因為 Octopress 很久沒更新,且只能用 Ruby 1.9.3,所以我推薦 Hexo 當 Blog system 會更好
Hexo 安裝教學
安裝教學
建議可以照著 官方教學 做,裡面的英文不會太難
以下也收集幾位不錯的網路教學
搬家後的第一篇文章 -Octopress 安裝筆記
How to Install Octopress on Heroku
[教學] 在 windows 上安裝 octopress 新手教學 / 初學者指南
How to Install Octopress on Heroku
這邊有詳細的QA
Octopress 介紹與安裝
Windows 8 安裝Octopress 記錄
上面的連結是當你看不懂我在寫什麼的時候,可以連去參照別人所寫的步驟,接下來我們就來開始安裝 Octopress
安裝 Ruby 192
首先要安裝 ruby1.9.2 for windows, 我是選 Ruby 1.9.2-p290,點兩下即可安裝,
安裝的時候,記得把 ruby 加入系統路徑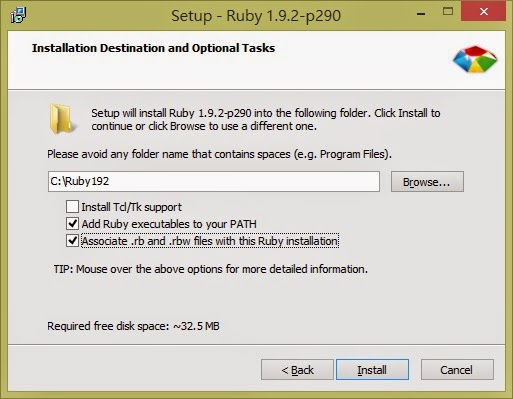
下載 Development Kit
安裝 DevKit,安裝其實就是解壓縮至 c:\devKit 之後,到該目錄執行
cd devkit
ruby dk.rb init
ruby dk.rb install
這邊一樣有 官方教學
安裝 Git
如果要在 Window 下使用 Git,就必須要安裝 msysgit 與 tortoisegit, 請參考網路文章 ,這裡不再詳述
下載 Octopress
打開 Git Bash 後鍵入
git clone git://github.com/imathis/octopress.git octopress
這個動作會把 Octopress 下載回來
建立 Octopress 基本環境設定
這邊要利用 Bundle 檢查相依性,在執行 ruby bundle 之前,最好先更新一下 ruby 環境
gem update --system
接下來安裝bundler,bundler 是管理 Gem 相依性的工具,他會根據Gemfile的設定,
自動下載與管理 gem 的套件,
gem install bundler
進入剛剛下載回來的 Octopress 目錄,在該目錄中,
利用 bundle 檢查 octopress 的 Gemfile 檔案中的套件相依性,並產生一個叫Gemfile.lock的檔案
cd octopress
bundle install
Hit 1: 以後如果使用gem update更新了 gem 裡面的套件,這邊也是要重新執行一次bundle install
Hit 2: 如果更改了 Gmefile 的檔案,最好把Gemfile.lock砍掉後,再次執行 bundle install
Hit 3: 有關bundle可參考簡介 Bundler
使用 rake 安裝 octopress 基本環境 rake install
這樣一來就算是完成設定了,接下來就是要準備 Deploy 到 GitHub 上面了
Hit:
rake install 可能發生
You have already activated rake 0.9.6, but your Gemfile requires rake 0.9.2.2.
也就是說,octopress所使用的 rake 是 0.9.2.2,但是你現在的是新版的,解法就是修改Gemfile中的 rake
gem 'rake', '> 0.9'
改成
gem 'rake', '> 0.9.6'
Deploy Octopress 到 GitHub 上面
這邊先提供一篇 官方教學 Deploying to Github Pages
這邊假設你擁有了 GitHub 的帳號,建立一個 repo 叫 yourname.github.com,如果你的帳號為 eric 的話,就是建立eric.github.com 的 repository。
注意:不要點選 Initialize this repository with a README
建立完之後,你會在你的repo那邊看到以下這種目錄 your_name/your_name.github.com
然後,使用 Git Bash 進入到剛下載回來的 Octopress 資料夾上
Hint: 不要使用 windows 的 console,否則 git 會失效
鍵入
rake setup_github_pages
這個動作會做以下幾點
- 要你輸入 Repository 的路徑,這時請將 Github 上面 SSH 的路徑複製下來貼上,如
git@github.com:eric/eric.github.io.git - 把你的 octopress remote source name 從
origin改成octopress - 把你剛剛輸入的git repository 換成 default origin remote.
- 切換你的 branch from master to source.
- Configure your blog’s url according to your repository.
- Setup a master branch in the _deploy directory for deployment.
接下來就是讓 octopress generate blog,輸入
rake generate
PS: 若 generate 這個指令發生錯誤,則請見文章最後 Troubleshooting 的部份
generate 是把網站用 ruby 給 generate 出來,generate 出來的網頁會放在 _deploy 目錄下面, deploy 是把 generate 出來的網站,deploy 到 Github 上了,所以 deploy 指令一定要在 Git Bash 裡面下, 而且是 deploy 到遠端的 master 分支下,貌似 gitHub 如果要作靜態網站的話,都是放在 master 這個分支, 如果 generate 沒問題的話,就可以把產生過後的blog,deploy上去了,鍵入 rake deploy 這個動作會把產生出來的blog,push 到 master 這個 Base branch 中
當然,不要忘記也把你的 source code 也一併丟到 Github 上去喔(此時應該為source)
git add .
git commit -m 'your message'
git push origin source
寫文章與後台
首先,這東西是沒有後台的,整個 source code 與 local 就是你的後台, 網站純粹是 ruby 的 jekyll 套件在 local 使用 rake generate 指令產生的 static 網站, 也就是在 local 是動態 generate 的,push 到 github 是 static 的,酷吧!
網站搞定之後,首先要寫第一篇文章,進入命令列模式
rake new_post["title"]
此時 Octopress 會幫你 generate 一篇新文章出來,可以在 Octopress 資料夾的 source\_posts 底下看到產生的新文章,
使用記事本軟體就可以打開,而裡面會出現
layout: post
title: "My First article"
date: 2012-08-01 14:57
comments: true
categories: How-To
其中要特別說明的是 categories ,分類的方式如下 # 單一分類 categories: Sass
# 多重分類 ex:1
categories: [CSS3, Sass, Media Queries]

# 多重分類 ex:2
categories:
- CSS3
- Sass
- Media Queries
文章的寫法是使用 markdown 語法,不用太擔心要學習很久,你就當作是再寫 txt file 就可以了,寫個兩三篇文章就會熟了。 這邊有 markdown 語法說明 可以參考,而 markdown 也是有 window 的編輯器,名子叫 MarkdownPad
寫好了之後可以下
rake preview
可以在 http://127.0.0.1:4000 這邊先預覽, 這邊值得一提的是,如果更改文章的內容,他也會即時反應,不需要在 rake generate
確定無誤之後,接下來就是輸入
rake generate
rake deploy
就推上去嚕
幫 Octopress 加上分類列表和標籤雲
我是使用 tokkonopapa 所開發的套件,安裝很簡單,可以見這篇 教學,
基本上也可以按照 官網上面 的做法,
他提供了兩種 category 的方式,分別是 List 與 cloud,選需要的加入至_config.yml中的default_asides:選項即可
喜歡 category_list 的,就加入 default_asides: [custom/asides/category_list.html, 原本的東西] 喜歡 tag_cloud 的,就加入 default_asides: [custom/asides/tag_cloud.html, 原本的東西] 兩個都加我也不反對啦 XD
幫文章加上繼續閱讀 (read more)
非常簡單,在文章中使用<!--more-->這個標籤即可
幫文章加上 comment(disqus)
這邊使用的是 Disqus 這個網站的服務,安裝方式可以參考
How to Use Disqus in Octopress
加入 Google Analysis 網站分析功能
去 Google Analysis 註冊並登入後, 他會給你一個 ID ,貼在 Octopress 目錄下的 _config.yml 檔案中的 google_analytics_tracking_id 即可,如 google_analytics_tracking_id: UA-12345678-9
如果你要在別地方 checkout 你的 blog
基本上 Octopress 會有兩個分支: source(文章原始檔),與 master(靠 rake generate 產生出來的網站),
不過是 source 比較重要,因為要靠他 compile 整個網站,記得取來之後,切換至 source ,還是要執行一次
gem install bundler
bundle install
rake setup_github_pages
可以看看 這篇的教學
例如出現 [[rejected]] master -> master ((non-fast forward)) 這個 non-fast forward 的意思是你的 parent commit 和遠端的不相同,也就是線圖有分岔,需要先 pull 回來處理好 merge 才能 push 上去。
解法1:
砍掉github上面的 repostory 的 master,先去我們的 repostiry 設定那邊把 default branch 從 msater 改成 source,
然後再回到reopstory那邊,有個branch的頁面,進去之後把 master 砍掉,這樣就不會有 non-fast forward 的問題了
貼 code 高亮
Octopress 貼上的 code 要有高亮必須裝 python,安裝的方式請見 這裡
修改背景
可修改\sass\custom下的 _styles.scss,加入
html {
background: #555555 url("/images/bg.png");
}
或是
html {
background: #fff
}
修改 Banner
可修改\sass\custom下的 _styles.scss,加入
header[role="banner"] {
background-image: url(/images/bg.png);
background-repeat: repeat;
}
Troubleshooting
以下收集各類疑難雜症
使用 Ruby 2.0 出現 yajl的錯誤
gem uninstall yajl-ruby
Ensure all the versions (ruby and x86-mingw32 are uninstalled)
gem install yajl-ruby --platform=ruby
bundle check
錯誤訊息: cannot load such file -- yajl
使用 rake generate 之後,出現
`cannot load such file -- yajl` 如果是使用ruby 2.0時,貌似ruby 2.0 的 DevKit 中的 yajl 與一般的不符,所以解法就是先移除所有的 yajl 後,再重新安裝
gem uninstall yajl-ruby再安裝 yajl 就可以了
gem install yajl-ruby --platform=ruby錯誤訊息: read_yaml: invalid byte sequence in Big5 (ArgumentError)
如果使用 rake generate 後,產生
C:/Ruby192/lib/ruby/gems/1.9.1/gems/jekyll-0.11.2/lib/jekyll/convertible.rb:29:
in `read_yaml': invalid byte sequence in Big5 (ArgumentError)這種錯誤是套件jekyll中的 convertible.rb 的編碼轉換的問題(奇怪這個問題很久了也沒解決?),
以ruby 2.0 為例,這個檔案位於C:\Ruby200\lib\ruby\gems\2.0.0\gems\jekyll-0.12.0\lib\jekyll\convertible.rb
使用記事本打開 convertible.rb,尋找以下的 ruby code
self.content = File.read(File.join(base, name))改成
self.content = File.read(File.join(base, name), :encoding => "utf-8")就可以了,如果還不行,請檢查你文章編碼是否為UTF-8(無BOM表格式)
出現 CP950 的錯誤訊息
rake generate 後,某個文章出現
invalid byte sequence in CP950 (ArgumentError)請見 錯誤訊息: read_yaml: invalid byte sequence in Big5 (ArgumentError)
出現 YAML Exception reading xxx.md: invalid byte sequence in xxx
rake generate 後,某個文章出現
YAML Exception reading xxx.md: invalid byte sequence in xxxx請檢查該文章的編碼,是否為UTF-8
出現 [rejected] master -> master (non-fast-forward)
To git@github.com:xxx/xxx.github.io.git
! [rejected]        master -> master (non-fast-forward)
error: failed to push some refs to 'git@github.com:xxx/xxx.github.io.git'
hint: Updates were rejected because the tip of your current branch is behind
hint: its remote counterpart. Merge the remote changes (e.g. 'git pull')
hint: before pushing again.
hint: See the 'Note about fast-forwards' in 'git push --help' for details.
比較快的解法就是去 github 那邊,到你的 repostory 那邊,選 branch 後,把 master 這個 branch 砍掉即可